Pool LUNs
The concept of pool LUNs was already mentioned in that post, but let’s go a little deeper into this topic, just to make sure it’s clear to everyone.
Pool LUN is similar to a traditional LUN. For example, most of the Unisphere operations, or secure CLI command can be used on pool LUNs and traditional LUNs in the same way. Most user-oriented functions works the same way, including LUN migration, local or remote protection or LUN properties information.
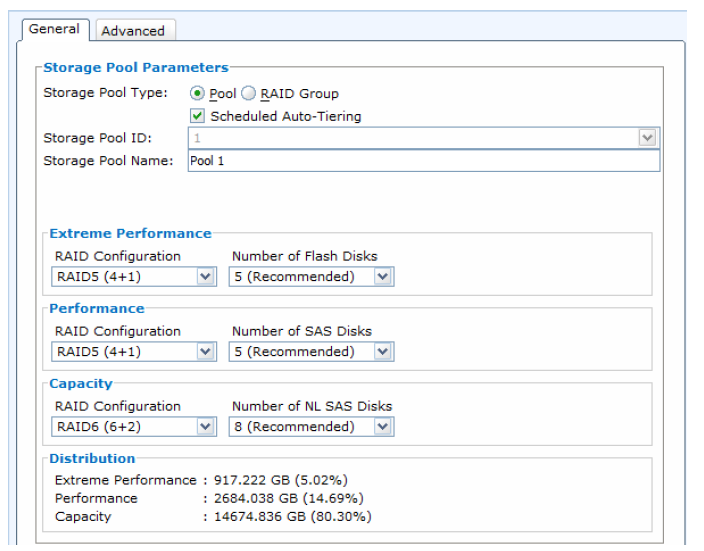
The main difference between pool LUN and traditional LUN (RAID LUN) is that traditional LUN is created straight on RAID group, whereas pool LUN is a logical size taken from a pool capacity. Creating LUN on pool gives us extra possibilities, such as using FAST VP (mentioned here) or choosing between thin and thick LUNs (Traditional LUNs are always thick).
Thin LUNs
The most important difference between thin LUN when compared to traditional LUN and/or thick LUN is that thin LUN presents more storage to an application than is physically allocated. What does that mean? Let me explain it on an example. Let’s say our linux admin whats a 600GB LUN, we create a thin LUN and present it to the host. If the linux host will consume only about 30% of space, so around 200GB the other 400GB will be still available on storage array. Whereas using traditional/thick LUN would consume the total size of LUN (in my example 600GB) during the LUN creation. Presenting storage that is not physically available avoids under-utilizing the storage system’s capacity.
There is a downside of that solution. Thin LUN typically has lower performance than thick LUNs because all of the user capacity is reserved upon creation of a thick LUN so the mapping requirements for a thick LUN are much less compared to a thin LUN.
Thick LUNs
Thick LUNs are fully allocated upon creating. This means that all 1GB slices will be allocated when the LUN is first created. Thick and thin LUNs can share the same pool. When a thick LUN is created, all of its capacity is reserved and allocated in the pool for use by that LUN. Therefore, a thick LUN will never run out of capacity.
Thick LUN concept has beneficial implications for FAST VP, full allocation within thick pool LUN creation gives better control which tier the slice are written to.
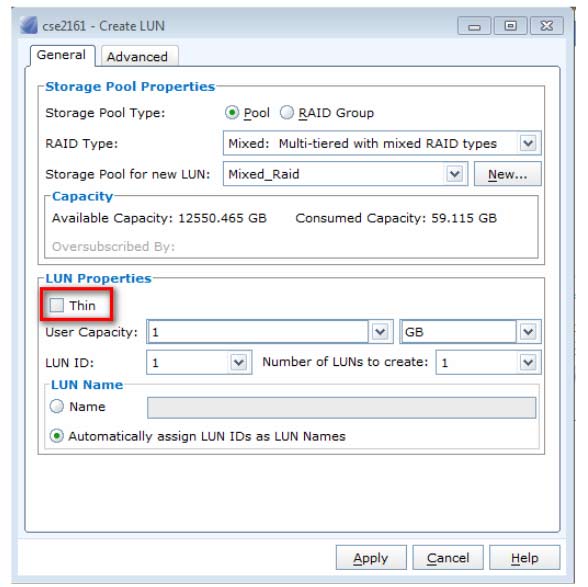
How to create a thin LUN
Creating a thin LUN in Unisphere is really easy, as you can notice on above printscreen. All you have to do is create a LUN from Pool (not RAID group) and check the box Thin. Yep – that’s it. Having thin LUN created in its properties you can check the LUN Capacity that will gives you two values:
- User Capacity – the capacity presented to the user, e.g. 600 GB LUN
- Consumed Capacity – the capacity actually consumed by the user, e.g. 200.1 GB