In next few entries I would like to describe some non-disruptive operations that are possible within Clustered Data ONTAP. In this article I will focus on a DataMotion for Volumes functionality. It is a build-in functionality that you get with your clustered ONTAP system. As I mentioned in my previous post about SVMs (What is SVM?) and in describing benefits of a cluster , data SVM is acting as a dedicated virtual storage controller, which is not “linked” to any single node, not even to single HA pair within the cluster. Volume move is an excellent example of this advantage. You can easily, non-disruptively (continue reading to understand it fully) move a volume between two different nodes, operation will be executed in the background and it will be practically invisible for Your users! There are some things you have to consider, of course. Especially if Your volumes contains LUNs, I will describe that a bit later.
Why do we need volume move anyways?
Volume move (DataMotion for Volumes) is a very useful tool used often in capacity and performance planning. It might happen (and almost always does) that your data aggregates utilization differs inside Your cluster. Having the possibility to non-disruptively move volumes across aggregates is great benefit in such cases. Also, often particular node in the cluster might have higher utilization (for example in terms of IOs) than others. You can choose the destination aggregate that belongs to different node (even in another HA pair within the same cluster!) to level-down the performance impact on each node. Another reason might be related to planned decommission of HA pair within the cluster, this can be done online (non-disruptively) as well, and as a preparation, one of the first steps would be to evacuate data from that particular nodes. Volume move is a perfect tool to do that.
volume move – how does that work?
Volumes (it can only be executed on FlexVols to be exact) during volume move operation are moved from one aggregate to another. As a consequence, this operation can also, at the same time, move the volume from one node to another (since an Aggregate is always owned by a single node). Even though, from administrator point of view, moving a volume can sometimes be limited to executing just a single command (or couple of “clicks” in System Manager GUI), I think it’s wise to know what’s going on in background of the operation. Once started:
- setup phase: a new volume is made on the destination aggregate (usually named temp__xxxx__yyyyy__original_volume_name, restricted, TMP)
- data copy phase: the initial copy from original volume to the new volume is started. During this whole operation the original volume is intact and available for client access. System is scheduling the copy with a low priority, which shouldn’t impact your production environment in any way. As a consequence volume move operation can easily take couple of days with larger volumes. In very busy systems, and couple of volumes being moved at the same time, the operation can take even weeks. It is worth to take under consideration. During this phase incremental data is transferred automatically.
- cutover phase: at the end of the move process there is a cutover phase. During cutover client access is temporarily blocked*. During this short time, a final replication from source volume to the destination volume is being made, identity swap is being made, which changes the destination volume to the source volume. After completion the move, system routes client traffic to the new source volume, resuming client access, and disposing old volume
How come the access is temporarily blocked* during the operation? Didn’t I mention this is a non-disruptive operation? Well – volume move is treated as non disruptive, because the window of blocked access cannot be longer by 45 seconds (by default). In this time window the client will not notice a disruption and will not time-out. If, for some reason ONTAP, will not complete the final phase in planned 45 seconds, system will abort the attempt of the cutover and allow client access to original source volume. Another attempt will be executed later on. You can adjust this 45 seconds window (possible options are from 30 seconds to 300 seconds).
I imagine you might not be completely satisfied with such situation, when ONTAP will block access for x seconds without any control from Your end. Thankfully, with CLI (Command Line Interface) you can execute the volume move, asking for a manual cutover. In such option, once the data transfer is completed, all new writes are also updated on destination volume. During that time you can choose exactly the window when you wish to perform a cutover. If you prefer to use System Manager (graphic interface) unfortunately the options are limited, you cannot schedule manual cutover from graphical interface.
Let’s move a volume!
Enough theory, I would like to show you how easy, in practice it is to move a volume, and what are some of the available options. Please consider, if your volume is hosting LUNs you would most definitely need to execute some pre-implementation and post-implementation steps, do not rush with moving volumes with LUNs before you took under consideration reporting nodes – especially if the destination Aggregate is on another HA pair within the cluster!
Moving a volume using System Manager
As I mentioned previously, with System Manager your options are limited. On the other hand You’ve got a user-friendly interface, so if you just want to schedule a volume move with no need for setting any extra options you can use Graphical Interface.
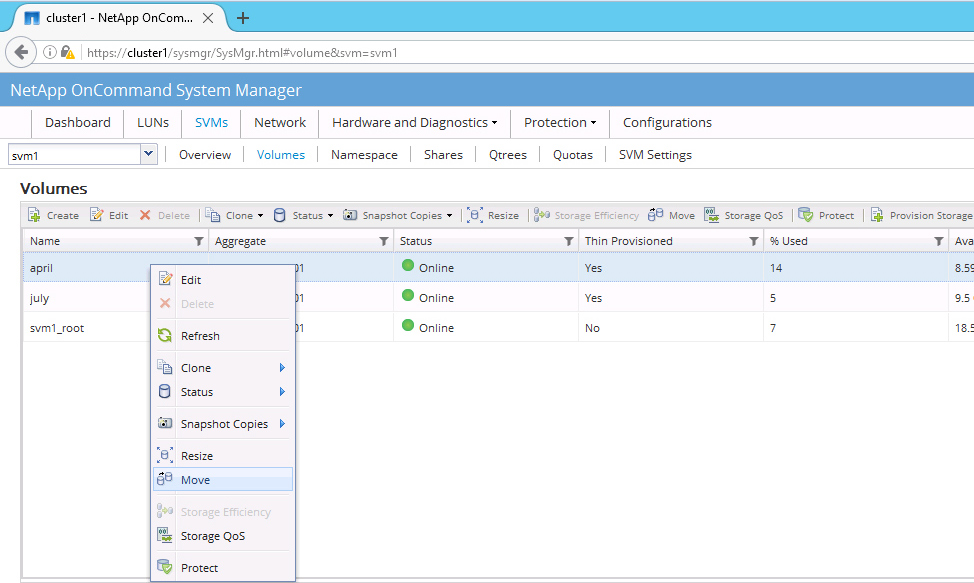
1. Navigate to Your Volume list of SVM, you wish to move volumes from. It will be slightly different for ONTAP 8.3.x and ONTAP 9. however If you want to move a volume, I’m sure you already know how to navigate to the Volume list (if not, maybe it’s not the best idea after all to continue?)
2. Right click on the Volume and select ‘Move’
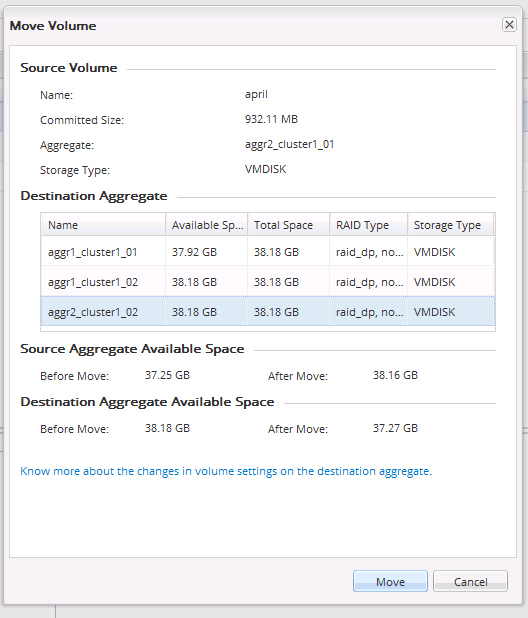
3. In the Volume Move dialog box select the destination Aggregate. This dialog box also shows you information about used space on Volume and Aggregate level (and also predicts the capacity after the operations finishes
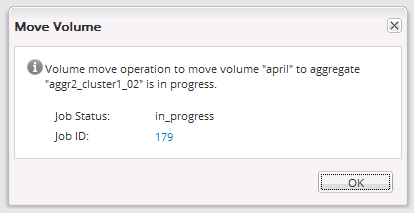
To Monitor the volume move job you have to navigate to Jobs panel, find Your job (you will see job number, once you confirm the volume move), and you can review the Status column.
Moving a volume using the CLI (Command Line)
1. Check available aggregates
cluster1::> volume container -vserver svm1 -volume april
vserver volume aggregate
------- ------ -----------------
svm1    april  aggr1_cluster1_01

cluster1::> volume move target-aggr show -vserver svm1 -volume april
Aggregate Name   Available Size   Storage Type
--------------   --------------   ------------
aggr1_cluster1_02   38.18GB       VMDISK
aggr2_cluster1_01   38.18GB       VMDISK
aggr2_cluster1_02   38.18GB       VMDISK
3 entries were displayed.

cluster1::>
cluster1::> vserver show -vserver svm1 -fields aggr-list
vserver aggr-list
------- ---------
svm1    -
Volume container checks the current aggregate. Second command checks what are the available data aggregates to use, third command checks if a SVM has assigned any aggregates. If the output is empty (like mine) it means that SVM can utilize all available data agggregates. You can also check on which node is your chosen aggregate, making sure this matches Your needs.
2. Verify reporting nodes (only for Volumes that contains LUNs)
My volume does not contain any LUNs, but if it would, command:
cluster1::> lun mapping show -vserver svm1 -volume vol1 -fields reporting-nodes
There are no entries matching your query.
cluster1::>
This command would list all the LUNs contained in Your volume, together with reporting-nodes. Why this is important? If you move Your volume to other aggregate, you often move it to another node, it is important to add this node (and it’s HA partner) to reporting-nodes by executing command lun mapping add-reporting-nodes. I would create an entry for reporting nodes in short future. On host side you would also have to do the path rescan to discover newly added paths for Your LUN(s) and add those new paths to MPIO configuration.
3. Start volume move
You can perform the validation of your command by executing:
cluster1::> volume move start -vserver svm1 -volume april -destination-aggregate aggr2_cluster1_01 -perform-validation-only
Validation succeeded.

cluster1::>
Let’s assume in my example I would like to manually perform na cutover. To do so change to advanced privilege, and set -cutover-action to “wait”
cluster1::> set -privilege advanced

Warning: These advanced commands are potentially dangerous; use them only when directed to do so by NetApp personnel.
Do you want to continue? {y|n}: y

cluster1::*> volume move start -vserver svm1 -volume april -destination-aggregate aggr2_cluster1_01 -cutover-action wait

Warning: When the transfer is complete, trigger the cutover to avoid loss of space savings from efficiency. Do you want to proceed? {y|n}: y
[Job 177] Job is queued: Move "april" in Vserver "svm1" to aggregate "aggr2_cluster1_01". Use the "volume move show -vserver svm1 -volume april" command to view the status of this operation.

cluster1::*> set -privilege admin
cluster1::>
4. Monitor the volume move
You can monitor the progress with volume move show command. If you haven’t specified manual cutover once the process is completed Your volume simply will not be listed anymore in the output of ‘volume move show’. In other words, it would mean the job is done and it’s just a history now.
cluster1::> volume move show
Vserver   Volume     State    Move Phase Percent-Complete Time-To-Complete
--------- ---------- -------- ---------- ---------------- ----------------
SVM1      april       healthy  replicating   53%           Tue Jul 23 15:33:16
In my example I have selected a manual cutover, once the initial replication is completed, the status is:
cluster1::> volume move show
Vserver   Volume     State    Move Phase Percent-Complete Time-To-Complete
--------- ---------- -------- ---------- ---------------- ----------------
svm1      april      alert    cutover_hard_deferred -   -
5. Perform a cutover (optional)
This point is only optional, that you have to execute if in step 3 you have chosen to go with manual cutover (-cutover-option wait).
cluster1::> volume move trigger-cutover -vserver svm1 -volume april

cluster1::> volume move show
Vserver   Volume     State    Move Phase Percent-Complete Time-To-Complete
--------- ---------- -------- ---------- ---------------- ----------------
svm1      april      healthy  cutover    93%              Sun Jul 23 09:06:13 2017

cluster1::> volume move show
Vserver   Volume     State    Move Phase Percent-Complete Time-To-Complete
--------- ---------- -------- ---------- ---------------- ----------------
svm1      april      healthy  finishing  93%              Sun Jul 23 09:06:17 2017

cluster1::> volume move show
This table is currently empty.
cluster1::>
As you see once the cutover was triggered (trigger-cutover), the state changed to healthy, phase cutover, than phase finishing, and a moment later volume move show didn’t return any output which means the operation was successfully finished.
6. Update LUN reporting nodes (optional)
This step is only needed if you had to edit reporting nodes in step 2. In such cases, after the move is completed you can remove the old reporting nodes. It’s not needed for NAS volumes, only for volumes that contains LUNs and were moved to another node (it is possible, and quite common to move data across two aggregates both owned by the same node, no action with reporting nodes needed in such case).
How deduplication affects volume move
DataMotion for Volume (volume move operation) are retaining deduplication savings on a FlexVol. If deduplication operation is in progress when the volume move is active, then during the volume move cutover phase the current deduplication ops will be aborted. Once the volume move is completed, deduplication operations can be restarted (however it will not pick-up and the previous checkpoint, just start from the beginning).