If you are completely new to ONTAP world, I encourage you first to have a quick read NetApp – Data ONTAP storage architecture – part 2 article. To better understand this entry, it would be best if you know what RAID groups are, what is an aggregate, and how data is stored on ONTAP.
Clustered ONTAP Aggregates
By default each cluster node has one aggregate known as the root aggregate. It is important difference, comparing cDOT to 7-mode, so I want to stress that out, each node in the cluster has it’s own root aggregate, that does not host any customer data. Within 7-mode it was only a “best practice” to have a separate aggregate for root volume, however with cDOT it is a requirement. A node’s root aggregate is created during ONTAP installation, in RAID-DP configuration (possibly even RAID-TEC).
Think for a second of a consequences. Let’s assume you’ve got some entry-level FAS HA-pair (2 nodes) with single 12-disk disk shelf. Root aggregate for node1 is consuming 3 disks (1 data disk + 2 parity disks – RAID-DP), node2 is consuming another 3 disks (1 data + 2 parity), and you are left with 6 disks. Since you have to leave at least one as spare, you’ve got 5 disks left, configuring data aggregate with single RAID-DP group, you have only 3 disks for plain data utilization! (2 disks are being utilized as parity). And that’s not the only consequence, if you think about it a bit more. Since you will have only 1 data aggregate, and an aggregate can be owned only by 1 head (node) at-time, it means that one of your nodes would do all the work, where second would just be an “passive” node, awaiting to take-over in case of some unlikely failure.
Of course this is very extreme example, but even if you have more shelves available, “loosing” 6 disks for each HA pair seems like a waste, doesn’t it ?
Advanced Drive Partitioning
To face this issue Netapp within ONTAP 8.3 introduced ADP (Advanced Drive Partitioning). Within this concept, each node would still have it’s own root aggregate, however ONTAP divide the Hard Drive (or SSD) into two partitions:
- a small root partition (for example for 1.46TB usable SSD drives, the usable root partition is around 22GB)
- a big data partition (on above example, the usable data is around 1.43TB)
Having done that, each partition, in terms of aggregate usage, can be treated almost as a separate disk. You can, for instance, utilize small root partition on 10 disks to build root aggregate for node1, and leave the “data partition” unused for time being. Let me show you this picture:
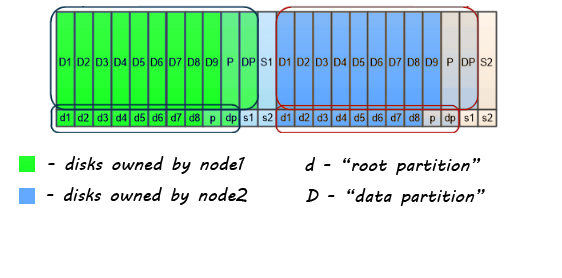
In this example there are two nodes, and 24 disks. All disks are partitioned, and :
- Disks D1-D9 (+P and DP – parities for RAID-DP) are used to build node1_aggr_data
- Disks D1-D9 (+P and DP – parities for RAID-DP) are used to build node2_aggr_data
What you should notice is, that node1 has only 1 spare for it’s data aggregate, as well as node2 – also has only 1 spare for it’s data aggregate.
- Disks d1-d8 (+ parities) are used to build root aggregate node1_aggr0
- Disks d1-d8 (+ parities) are used to build root aggregate node2_aggr0
In this case, each root aggregate have 2 spares available, because root aggr is build only from 10 “disks” (8 data + 2 parity), where-as data aggregates are build from 11 “disks” (9 data + 2 parity). In this case I put quota on disks – because those are actually partitions.
So, I guess your big request right now is – show me that in example! There you go!
First let me list all the disks available from our cluster. For that I will list disks with ‘disk show’ command (I have done here a small trick, changing default order with rows Owner and Container Name, it’s just a cosmetic change, but should make it easier to read for You).
aff_cluster1::> disk show -node node2,node1
                     Usable           Disk    Container              Container
Disk                   Size Shelf Bay Type    Type        Owner      Name
---------------- ---------- ----- --- ------- ----------- --------- --------
2.10.0               1.46TB    10   0 SSD     shared      node1       node1_aggr0, node1_aggr_data
2.10.1               1.46TB    10   1 SSD     shared      node1       node1_aggr0, node1_aggr_data
2.10.2               1.46TB    10   2 SSD     shared      node1       node1_aggr0, node1_aggr_data
2.10.3               1.46TB    10   3 SSD     shared      node1       node1_aggr0, node1_aggr_data
2.10.4               1.46TB    10   4 SSD     shared      node1       node1_aggr0, node1_aggr_data
2.10.5               1.46TB    10   5 SSD     shared      node1       node1_aggr0, node1_aggr_data
2.10.6               1.46TB    10   6 SSD     shared      node1       node1_aggr0, node1_aggr_data
2.10.7               1.46TB    10   7 SSD     shared      node1       node1_aggr0, node1_aggr_data
2.10.8               1.46TB    10   8 SSD     shared      node1       node1_aggr0, node1_aggr_data
2.10.9               1.46TB    10   9 SSD     shared      node1       node1_aggr0, node1_aggr_data
2.10.10              1.46TB    10  10 SSD     shared      node1       node1_aggr_data
2.10.11              1.46TB    10  11 SSD     shared      node1       -
2.10.12              1.46TB    10  12 SSD     shared      node2       node2_aggr0, node2_aggr_data
2.10.13              1.46TB    10  13 SSD     shared      node2       node2_aggr0, node2_aggr_data
2.10.14              1.46TB    10  14 SSD     shared      node2       node2_aggr0, node2_aggr_data
2.10.15              1.46TB    10  15 SSD     shared      node2       node2_aggr0, node2_aggr_data
2.10.16              1.46TB    10  16 SSD     shared      node2       node2_aggr0, node2_aggr_data
2.10.17              1.46TB    10  17 SSD     shared      node2       node2_aggr0, node2_aggr_data
2.10.18              1.46TB    10  18 SSD     shared      node2       node2_aggr0, node2_aggr_data
2.10.19              1.46TB    10  19 SSD     shared      node2       node2_aggr0, node2_aggr_data
2.10.20              1.46TB    10  20 SSD     shared      node2       node2_aggr0, node2_aggr_data
2.10.21              1.46TB    10  21 SSD     shared      node2       node2_aggr0, node2_aggr_data
2.10.22              1.46TB    10  22 SSD     shared      node2       node2_aggr_data
2.10.23              1.46TB    10  23 SSD     shared      node2       -

24 entries were displayed.
First what you should note is that those disks are type shared – it means they are partitioned. Second observation – If you look closely this is exactly the situation as on the picture above:
- 12 disks are owned by node1, the other 12 disks are owned by node2
- node1_aggr0 is build from disks 2.10.0 – 2.10.9, node2_aggr0 is build from 2.10.12 – 2.10.21
- Disk 2.10.23 and disk 2.10.11 is a “spare” for aggr0, but it is used for aggr_data
But how does that look from as “show-spare-disks” point of you? (You may ask), Let me show you:
aff_cluster1::> storage aggregate show-spare-disks

Original Owner: node1
 Pool0
  Partitioned Spares
                                                            Local    Local
                                                             Data     Root Physical
 Disk                        Type     RPM Checksum         Usable   Usable     Size Status
 --------------------------- ----- ------ -------------- -------- -------- -------- --------
 2.10.11                     SSD        - block            1.43TB  21.56GB   1.46TB zeroed
 2.10.10                     SSD        - block                0B  21.56GB   1.46TB zeroed

Original Owner: node2
 Pool0
  Partitioned Spares
                                                            Local    Local
                                                             Data     Root Physical
 Disk                        Type     RPM Checksum         Usable   Usable     Size Status
 --------------------------- ----- ------ -------------- -------- -------- -------- --------
 2.10.23                     SSD        - block            1.43TB  21.56GB   1.46TB zeroed
 2.10.22                     SSD        - block                0B  21.56GB   1.46TB zeroed

4 entries were displayed.
It’s actually quite neat output. You can see what are the partition sizes, which one are used and which one are available, and if parition(s) is zeroed or not.
ADP Support
As for now support for Advanced Drive Partitioning is still limited. ONTAP supports HDD partitioning for FAS 22xx and FAS 25xx, and the support is only for drive installed in the internal shelf for those models. More to come, ADP can be only enabled during system installation time. In other words – to “convert” and existing system to use the ADP you must evacuate the data from the cluster, and re-install ONTAP.
The situation is a little bit different with SSD drives. All-Flash FAS (AFF) has Advanced Data Partitioning enabled in entry-level, mid-range and high-end platforms.
One thought on “NetApp cDOT – Advanced Drive Partitioning”