In this entry I would like briefly describe how to protect the SVM (vserver) root volume by creating load-sharing mirrors on every node of a cluster. If you are unfamiliar with SVMs, check out my article NetApp cDOT – what is SVM or vserver ?. Every vserver has it’s root volume, which is an entry point fo a namespace provided by that SVM (You can read more about namespaces in NetApp cDOT – Namespace, junction path entry). But, besides residing at the top level of the namespace hierarchy, a root volume is a small in size FlexVol volume that needs to be protected. In case of root volume unavailability there would be no NAS access to the data, since NAS clients could not access the namespace hierarchy. Therefore it is considered as best practice to create load-sharing mirrors of the root volume on each node of the cluster.
SnapMirror Load-Sharing Mirror Relationship
Distributing an SVM namespace root volume to other nodes in the cluster by SnapMirror LS (Load-Sharing) relationship increase the availability for NAS clients. Within version ONTAP 8.1 – ONTAP 9.0 you can also use Snapmirror Load-Sharing to mirror data volumes, to increase performance for read-only workloads. However within ONTAP 9.1 SnapMirror LS is only supported for SVM root volumes.
To protect an SVM namespace root volume it is a best practice to create a load-sharing mirror on every node, including the node in which the root volume is located. This last sentence might not sound right at the first look, but in fact it should be this way. When the volume has LS mirrors, all reads are always directed to one of the LS mirror. If your relationship set doesn’t have a local copy, all reads for root volume will be redirected to another node in the cluster, which might impact the performance.
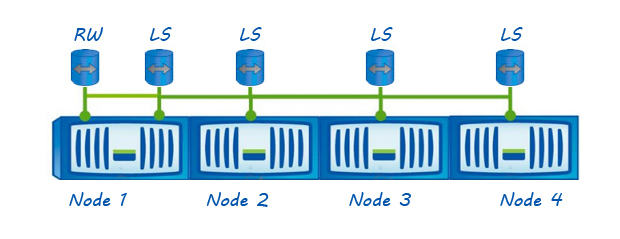
On the above example you can see a Snapmirror LS-set. It contains of one R/W (Read/Write) SVM root volume, and 4 LS mirrors, each mirror resides on each physical node in the cluster. When a client request access to a volume configured with a set of load-sharing mirrors, ONTAP directs all reads request to one of the LS mirror. It is important to include a load-sharing mirror on the same node, as the source volume.
Create a SnapMirror Load-Sharing set
1. Identify data aggregates for each node in the cluster
To create a SnapMirror LS set you can identify the data aggregates of each node. In my example I have two-node cluster:
cluster1::> storage aggregate show -root false

Aggregate     Size Available Used% State   #Vols  Nodes            RAID Status
--------- -------- --------- ----- ------- ------ ---------------- ------------
aggr1_cluster1_01 72.53GB 72.27GB 0% online     5 cluster1-01      raid_dp,
                                                                   normal
aggr1_cluster1_02 72.53GB 72.51GB 0% online     1 cluster1-02      raid_dp,
                                                                   normal
2 entries were displayed.

cluster1::>
By specifying the option -root false you can make sure you will not list the node’s aggr0 which should not contain any customer data (that includes also SVM root volumes).
2. Create a volume on each node
Based on list of Your aggregates you should chose one aggregate per node to create a volume (those volumes will be used as snapmirror destination volumes for Your load-sharing set).
Naming convention for Your volumes is pretty much unrestricted, however I prefer to use svm_rootvol_mX where X is the number of each load-sharing destination. Based on my above example I have to create two volumes for my svm1_rootvol. The volume type has to be set as DP, because those volumes will be set as snapmirror destination volumes.
cluster1::> volume create -vserver svm1 -volume svm1_rootvol_m1 -aggregate aggr1_cluster1_01 -size 1gb -state online -type DP
[Job 126] Job succeeded: Successful

cluster1::> volume create -vserver svm1 -volume svm1_rootvol_m2 -aggregate aggr1_cluster1_02 -size 1gb -state online -type DP
[Job 127] Job succeeded: Successful

cluster1::>
You can verify the volumes are succesfully created, with type DP and appropriate size by executing command volume show -vserver <your_SVM_name>.
3. Create load-sharing relationship
Next step is to create a load-sharing relationship between the root volume (the original source) and each volume you have created in previous step. In my example I have to create just two relationships, since my cluster have 2 nodes and I have only created 2 volumes, however in example of 6-node cluster you would have to create 6 relationship, for each SVM root volume would be the source.
cluster1::> snapmirror create -source-path svm1:svm1_rootvol -destination-path svm1:svm1_rootvol_m1 -type LS
[Job 128] Job succeeded: SnapMirror: done

cluster1::> snapmirror create -source-path svm1:svm1_rootvol -destination-path svm1:svm1_rootvol_m2 -type LS
[Job 130] Job succeeded: SnapMirror: done

cluster1::>
As you can notice, the snapmirror type is LS. You can verify the status with snapmirror show command.
cluster1::> snapmirror show -vserver svm1
                                                                       Progress
Source            Destination Mirror  Relationship   Total             Last
Path        Type  Path        State   Status         Progress  Healthy Updated
----------- ---- ------------ ------- -------------- --------- ------- --------
cluster1://svm1/svm1_rootvol LS cluster1://svm1/svm1_rootvol_m1 Uninitialized Idle - - -
                                cluster1://svm1/svm1_rootvol_m2 Uninitialized Idle - - -
2 entries were displayed.

cluster1::>
Those relationships are still uninitialized. That’s OK, we haven’t done that yet, so that was expected.
4. Initialize a SnapMirror Load-Sharing set
The final step is to initilize the set of load-sharing mirrors, this can be completed with just a single command, specyfing the source volume.
cluster1::> snapmirror initialize-ls-set svm1:svm1_rootvol
[Job 131] Job is queued: snapmirror initialize-ls-set for source "cluster1://svm1/svm1_rootvol".

cluster1::> snapmirror show -vserver svm1
                                                                       Progress
Source            Destination Mirror  Relationship   Total             Last
Path        Type  Path        State   Status         Progress  Healthy Updated
----------- ---- ------------ ------- -------------- --------- ------- --------
cluster1://svm1/svm1_rootvol LS cluster1://svm1/svm1_rootvol_m1 Snapmirrored Idle - true -
                                cluster1://svm1/svm1_rootvol_m2 Snapmirrored Idle - true -
2 entries were displayed.

cluster1::>
With the first command I have initilized the ls-set (snapmirror initialize-ls-set command). After a minute or two, by executing snapmirror show I have confirmed that my relationship is initialized, in healthy Snapmirrored state.
Updating a load-sharing mirror set
You’ve got a choice of manually update the load-sharing set, or to add a schedule for the update. If you want to manually update the load-sharing set you can execute the command
cluster1::> snapmirror update-ls-set svm1:svm1_rootvol
[Job 133] Job is queued: snapmirror update-ls-set for source "cluster1://svm1/svm1_rootvol".

cluster1::> snapmirror show -vserver svm1
                                                                       Progress
Source            Destination Mirror  Relationship   Total             Last
Path        Type  Path        State   Status         Progress  Healthy Updated
----------- ---- ------------ ------- -------------- --------- ------- --------
cluster1://svm1/svm1_rootvol LS cluster1://svm1/svm1_rootvol_m1 Snapmirrored Transferring 68KB true -
                                cluster1://svm1/svm1_rootvol_m2 Snapmirrored Transferring - true -
2 entries were displayed.

cluster1::> snapmirror show -vserver svm1
                                                                       Progress
Source            Destination Mirror  Relationship   Total             Last
Path        Type  Path        State   Status         Progress  Healthy Updated
----------- ---- ------------ ------- -------------- --------- ------- --------
cluster1://svm1/svm1_rootvol LS cluster1://svm1/svm1_rootvol_m1 Snapmirrored Idle - true -
                                cluster1://svm1/svm1_rootvol_m2 Snapmirrored Idle - true -
2 entries were displayed.

cluster1::>
First command executed the update-ls-set, I have executed snapmirror show a few seconds later, as you can see, the relationship was in Transferring state. After additional few seconds, the transfer has completed.
Second option is to add a schedule to Your snapmirror relationship. To verify if there is any schedule assigned to the relationship:
cluster1::> snapmirror show -vserver svm1 -fields schedule
source-path                  destination-path                schedule
---------------------------- ------------------------------- --------
cluster1://svm1/svm1_rootvol cluster1://svm1/svm1_rootvol_m1 -
cluster1://svm1/svm1_rootvol cluster1://svm1/svm1_rootvol_m2 -
2 entries were displayed.

cluster1::>
To add a schedule:
cluster1::> snapmirror modify -source-path svm1:svm1_rootvol -destination-path * -schedule 5min
[Job 134] Job succeeded: SnapMirror: done
[Job 135] Job succeeded: SnapMirror: done
2 entries were acted on.

cluster1::> snapmirror show -vserver svm1 -fields schedule
source-path                  destination-path                schedule
---------------------------- ------------------------------- --------
cluster1://svm1/svm1_rootvol cluster1://svm1/svm1_rootvol_m1 5min
cluster1://svm1/svm1_rootvol cluster1://svm1/svm1_rootvol_m2 5min
2 entries were displayed.

cluster1::>
I have used * for -destination-path to add a schedule for each relationship I have created in previous steps.
If you like to know more in that matter I encourage you to read also part 2 of this article: NetApp cDOT – Restore SVM root volume